
Use Cloudflare Warp as an extra internet breakout via a Debian VM
June 13, 2025
Imagine you have an internet connection that doesn’t peer well with sites across the great pond, or you want to add an extra layer of security while you browse websites that originate from some parts of the world. In this post, we’ll set up Cloudflare Warp as an internet breakout point within an existing network infrastructure. That way we can route selected traffic securely over Cloudflare’s network, leveraging their performance and privacy features. We’ll use a Debian VM to run Warp, through warp-cli, and a Sophos XG firewall to control and route traffic. This way we only need to configure the router instead of all the seperate clients.
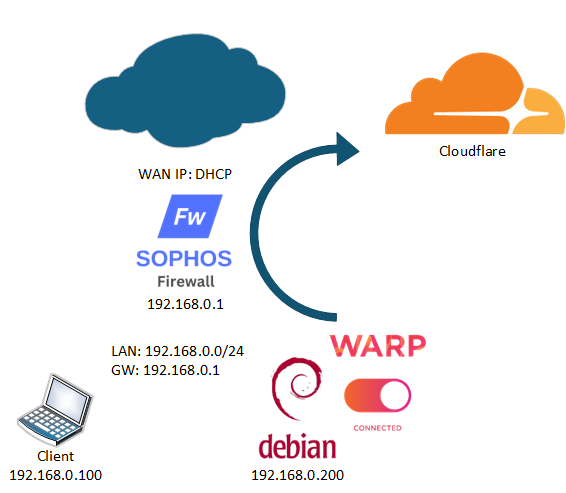
So we have a network, 192.168.0.0/24 with a Sophos firewall as the default gateway. This machine has 192.168.0.1 as its internal ip and get its WAN ip from the provider with DHCP. The Debian VM we will use as the Warp router has 192.168.0.254 as internal ip. One of the clients has 192.168.0.100 and that gives us the following situation:
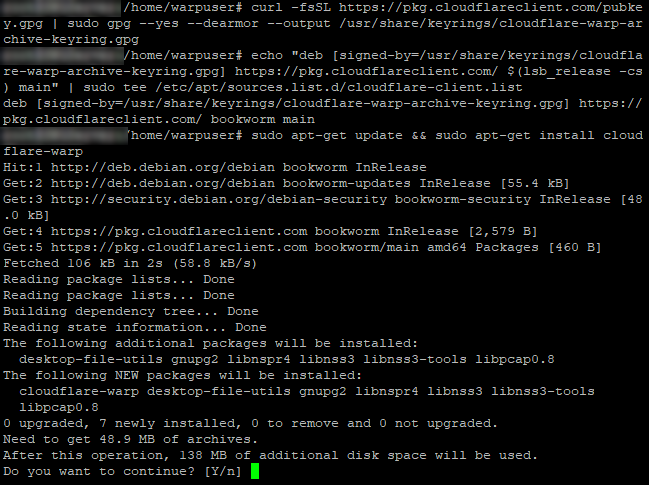
We assume you know how to setup a basic Debian installation so we will work from there. I have setup my Debian with an extra user, warpuser, and will use that user to run the warp-cli. First we will install warp-cli using the official steps, but make sure we have sudo, curl and gpg, which we need to install as root as we might not have sudo yet.apt-get install -y sudo curl gpg
Onto the installation, first lets add the cloudflare gpg key to the system:curl -fsSL https://pkg.cloudflareclient.com/pubkey.gpg | sudo gpg --yes --dearmor --output /usr/share/keyrings/cloudflare-warp-archive-keyring.gpg
Than we add this repo to the apt repositoriesecho "deb [signed-by=/usr/share/keyrings/cloudflare-warp-archive-keyring.gpg] https://pkg.cloudflareclient.com/ $(lsb_release -cs) main" | sudo tee /etc/apt/sources.list.d/cloudflare-client.list
Finally we can install the warp-clisudo apt-get update && sudo apt-get install cloudflare-warp
Once installed we can invoke the status command so it will give us the ability to accept the terms. The command to do this is:warp-cli status
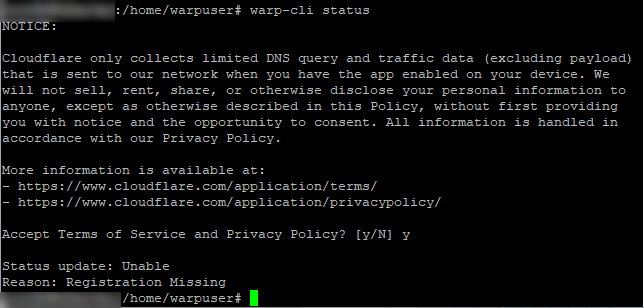
Once we accept the terms we will see that the registration is missing, so we need to get the client registered with cloudflare. You can make the registration with your own team in Cloudflare or create a new one. For now we go with a new registration, we can always re-enrol later. Once the registration is done we let it connect immediately using the following commands:warp-cli registration && warp-cli connect

Now we should be able to get the status as connected and get more info about the connection by grabbing their status page.
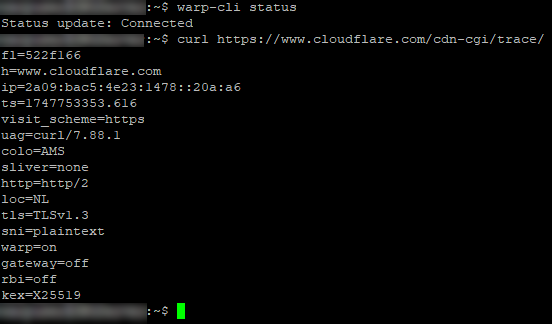
We can see that the status is connected and that we are currently connected to the AMS node and that warp is on. Good! If you want to use different modes or filters you can look here.
The tunnel is up, but we still need to make sure our clients are able to use the Debian VM as an internet breakout. For that we need it to allow forward traffic. I order to do so we need to edit /etc/sysctl.conf. Uncomment the following lines:net.ipv4.ip_forward=1net.ipv6.conf.all.forwarding=1
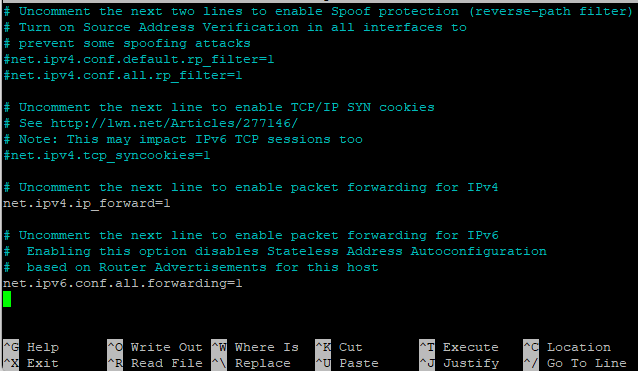
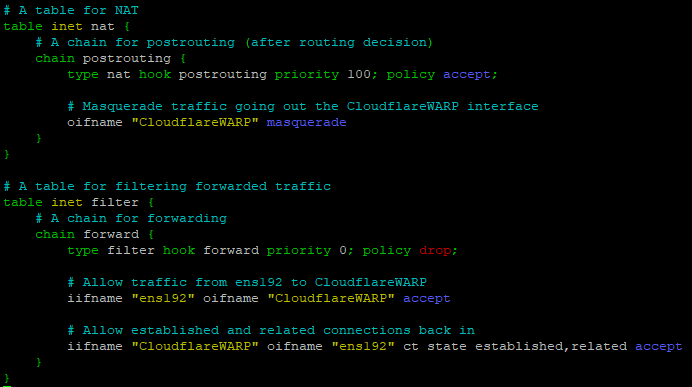
Save the file and apply the changes with sudo sysctl -p Once done it will echo the changes and you are almost good to go. We now set the ability to forward traffic, but we still need to tell the firewall what to do with the traffic. Since Debian uses nftables nowadays we will use that. Keep in mind that you might need to change the interface settings because they are different than mine. My interfaces are called ens192 for the locally connected interface and CloudflareWARP for the warp connected interface. We edit the nftables again with nano since I can’t close vim. Add the following lines to nftables:
# A table to NAT
table inet nat {
    # A chain for postrouting (after routing decision)
    chain postrouting {
        type nat hook postrouting priority 100; policy accept;

        # Masquerade traffic going out the CloudflareWARP interface
        oifname "CloudflareWARP" masquerade
    }
}

# A table for filtering forwarded traffic
table inet filter {
    # A chain for forwarding
    chain forward {
        type filter hook forward priority 0; policy drop;

        # Allow traffic from ens192 to CloudflareWARP
        iifname "ens192" oifname "CloudflareWARP" accept

        # Allow established and related connections back in
        iifname "CloudflareWARP" oifname "ens192" ct state established,related accept
    }
}
Than enable and start nftables, to be sure.sudo systemctl enable nftables
sudo systemctl start nftables

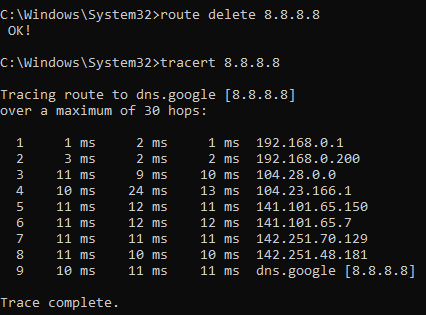
Once this is done the Debian VM should allow traffic to flow through the machine and be routed back to where it came from. All we need to do now is to let machines, or the main network gateway know that they can use this connection. To add the route for just the Windows machine we use the command route add x.x.x.x mask x.x.x.x 192.168.0.200. This is because we have our Debian VM at 192.168.0.200. As an example I have made a trace to Google\8.8.8.8.
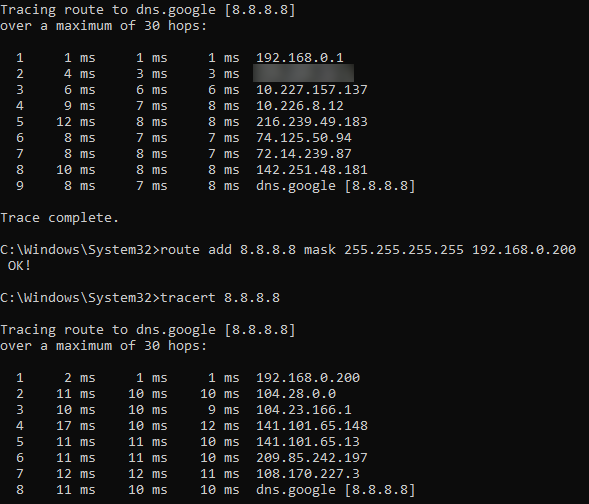
In the first trace you can see that it goes through my default gateway, the Sophos Firewall. And once I add the route and redo the trace you can see that it goes directly to the Debian VM and than routes the traffic via Cloudflare.
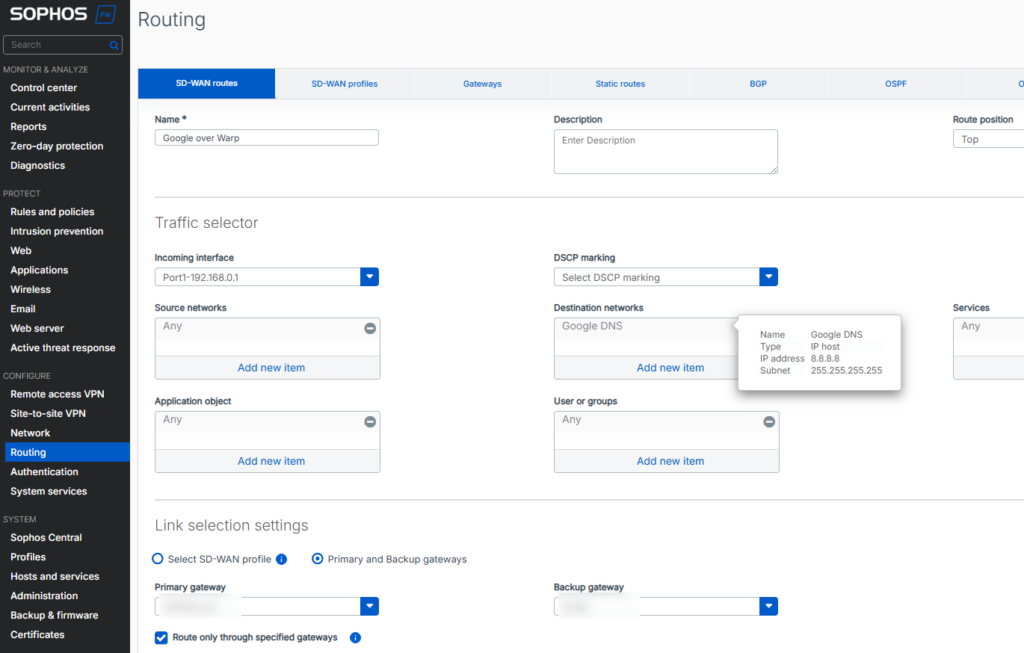
Now in order to make sure that all the network connected devices can use this we will create a route at the default gateway. In my case I can use the SD-WAN option on my Sophos XG. To create this rule, I first need to define the Debian VM as a gateway. So we go to ‘Routing’ and than ‘Gateways’

Than we can create the SD-WAN route. I use the option ‘Primary and Backup gateways’ so it will use my default internet gateway when the WARP connection is down. I also enable the option ‘Route only through specified gateways’ to make sure that just these gateways are used.
For Sophos UTM (or any other router that doesn’t support SD-WAN) you can just make a static route:
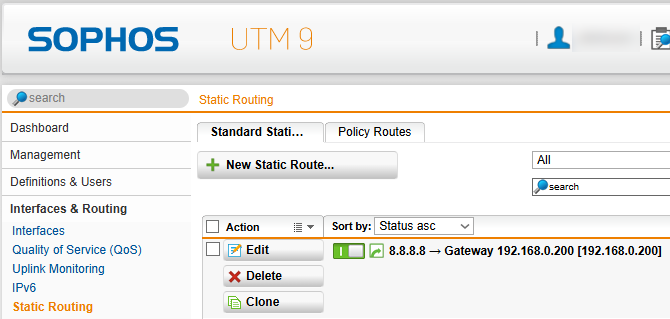
Once you added the route, either through SD-WAN or static route, you can delete the manually added route. If all goes as planned the traffic will go to the Sophos default gateway, than to the Debian VM and than out over WARP.
Perfect! Now we made sure this works we can add websites, ip segments or full networks that we want to route out over the WARP tunnel. This can be for a number of reasons, security, privacy, speed, you name it. Sophos has a number of countries defined by default so I added a bunch of countries to my WARP rule that will increase my speed to those countries and also add a layer of security.